Player/Missile Blog
Here I’ll be blogging about random things related to the podcast and the development of Omnivore, the Atari 8-bit Binary Editor.
Aug 11, 2016: Track & Field on MAME
Created and installed Track & Field panels on my upright cab and thinking about hacking the rom to make it easier to qualify for my kids.
In the Advmame source, src/drivers/trackfld.c includes the ROM layout:
ROM_START( trackfld )
        ROM_REGION( 0x10000, REGION_CPU1, 0 )     /* 64k for code + 64k for decrypted opcodes */
        ROM_LOAD( "a01_e01.bin",  0x6000, 0x2000, CRC(2882f6d4) SHA1(f7ddae2c5412a2849efd7f9629e92a5b0328e7cb) )
        ROM_LOAD( "a02_e02.bin",  0x8000, 0x2000, CRC(1743b5ee) SHA1(31301031a525f893c31461f634350f01a9492ef4) )
        ROM_LOAD( "a03_k03.bin",  0xa000, 0x2000, CRC(6c0d1ee9) SHA1(380ab2162153a61910a6fe5b6d091ca9451ad4fd) )
        ROM_LOAD( "a04_e04.bin",  0xc000, 0x2000, CRC(21d6c448) SHA1(6c42cc76302485954a31520bdd08469fa948c72f) )
        ROM_LOAD( "a05_e05.bin",  0xe000, 0x2000, CRC(f08c7b7e) SHA1(50e65d9b0ea37d2afb2dfdf1f3e1378e3290bc81) )

        ROM_REGION( 0x10000, REGION_CPU2, 0 )   /* 64k for the audio CPU */
        ROM_LOAD( "c2_d13.bin",   0x0000, 0x2000, CRC(95bf79b6) SHA1(ea9135acd7ad162c19c5cdde356e69792d61b675) )

        ROM_REGION( 0x6000, REGION_GFX1, ROMREGION_DISPOSE )
        ROM_LOAD( "h16_e12.bin",  0x0000, 0x2000, CRC(50075768) SHA1(dfff92c0f59dd3d8d3d6256944bfd48792cef6a9) )
        ROM_LOAD( "h15_e11.bin",  0x2000, 0x2000, CRC(dda9e29f) SHA1(0f41cde82bb60c3f1591ee14dc3cff4642bbddc1) )
        ROM_LOAD( "h14_e10.bin",  0x4000, 0x2000, CRC(c2166a5c) SHA1(5ba25900e653ce4edcf35f1fbce758a327a715ce) )

        ROM_REGION( 0x8000, REGION_GFX2, ROMREGION_DISPOSE )
        ROM_LOAD( "c11_d06.bin",  0x0000, 0x2000, CRC(82e2185a) SHA1(1da9ea20e7af0b49c62fb39834a7ec686491af04) )
        ROM_LOAD( "c12_d07.bin",  0x2000, 0x2000, CRC(800ff1f1) SHA1(33d73b18903e3e6bfb30f1a06db4b8105d4040d8) )
        ROM_LOAD( "c13_d08.bin",  0x4000, 0x2000, CRC(d9faf183) SHA1(4448b6242790783d37acf50704d597af5878c2ab) )
        ROM_LOAD( "c14_d09.bin",  0x6000, 0x2000, CRC(5886c802) SHA1(884a12a8f63600da4f23b29be6dbaacef37add20) )

        ROM_REGION( 0x0220, REGION_PROMS, 0 )
        ROM_LOAD( "361b16.f1",    0x0000, 0x0020, CRC(d55f30b5) SHA1(4d6a851f4886778307f75771645078b97ad55f5f) ) /* palette */
        ROM_LOAD( "361b17.b16",   0x0020, 0x0100, CRC(d2ba4d32) SHA1(894b5cedf01ba9225a0d6215291857e455b84903) ) /* sprite lookup table */
        ROM_LOAD( "361b18.e15",   0x0120, 0x0100, CRC(053e5861) SHA1(6740a62cf7b6938a4f936a2fed429704612060a5) ) /* char lookup table */

        ROM_REGION( 0x10000, REGION_SOUND1, 0 ) /* 64k for speech rom */
        ROM_LOAD( "c9_d15.bin",   0x0000, 0x2000, CRC(f546a56b) SHA1(caee3d8546eb7a75ce2a578c6a1a630246aec6b8) )
ROM_END
and also the note that it’s encrypted using the konami1_decode routine which is located in the src/machine/konami.c routine. From that, it appears that it’s just an opcode scrambler where it depends on the address. Relevant code:
xormask = 0;
if (address & 0x02) xormask |= 0x80;
else xormask |= 0x20;
if (address & 0x08) xormask |= 0x08;
else xormask |= 0x02;
return opcode ^ xormask;
Hmmm, an Omnivore project! It turns out that the xormask pattern repeats every 16 bytes:
[34, 34, 130, 130, 34, 34, 130, 130, 40, 40, 136, 136, 40, 40, 136, 136]
so it’s easy to make a fast numpy mapping rather than usin a slow python loop. As a test, I looked at one of the roms from the CPU1 region and ran a little python program:
#!/usr/bin/env python

import numpy as np

def konami1_xormask(address):
    xormask = 0;
    if (address & 0x02):
       xormask |= 0x80;
    else:
        xormask |= 0x20;
    if (address & 0x08):
       xormask |= 0x08;
    else:
       xormask |= 0x02;
    return xormask

def konami1_decodebyte(opcode, address):
    xormask = konami1_xormask(address)
    return opcode ^ xormask;

if __name__ == "__main__":
    for addr in range(128):
        source = 0xff
        mask = konami1_xormask(addr)
        decrypted = konami1_decodebyte(source, addr)
        encrypted = decrypted ^ mask
        print addr, source, mask, decrypted, encrypted

    xorlist = []
    for addr in range(16):
        xorlist.append(konami1_xormask(addr))
    xorlist = np.asarray(xorlist, dtype=np.uint8)

    rom = np.fromfile("a01_e01.bin", dtype=np.uint8)
    x = np.tile(xorlist, len(rom) / len(xorlist))
    raw = rom ^ x
    raw.tofile("a01_e01.bin.raw")
I loaded the resulting file up into Omnivore and it now displays a reasonable 6809 disassembly! I don’t know 6809, but it looks like code, anyway.
Apr 30, 2016: Lots more thinking about Jumpman
Stay tuned! As mentioned on the latest episode of the ANTIC podcast, Kevin and I have been reverse engineering Jumpman. We’ll have lots more to announce soon.
Apr 3, 2016: Thinking about Jumpman
I’m interested in hacking around with Jumpman, perhaps seeing if it’s possible to create new levels.
Here are some links to various Jumpman projects:
Reverse-engineered source code for PC version. Perhaps there are similarities in the level format?
In that commented code, there’s a table describing the level format:
CSEG    SEGMENT
        ASSUME  CS:CSEG,DS:CSEG,ES:CSEG
        INCLUDE J:JUMPTBLE.ASM
        ORG     9300H
LEVEL_NUM       DB      '05'            ;0-1
SCREEN_DRW      DW      SCR_TABLE       ;2-3
TARGET_LIST     DW      TAR_LIST        ;4-5
JUMPMAN_AREA    DW      JMA             ;6-7
JMC1            DW      FJM1            ;8-9
JMC2            DW      FJM2            ;a-b
NUM_TARGETS     DB      14              ;930c
NUM_BULLETS     DB      0               ;d
BONUS_VALUE     DB      '15'            ;930e-f
PRE_PLAY:       JMP     INITS           ;9310h
PLAY:           JMP     STARTS          ;9313h
POST_PLAY:      JMP     DONES           ;9316h
PLAYER_LIST     DW      PLAYERS         ;19-1a
START_POS       DW      152,94          ;1b-1c, 1d-1e
BULLET_LIST     DW      0               ;1f-20
SCR_TABLE:
        DW      128,12,1,136,10,2,152,8,2,168,10,2,184,12,1,8,32,3,56,32,5
        DW      96,34,1,104,36,1,112,38,1,120,40,1,128,42,1,136,44,1,144,46,1
        DW      152,48,2,168,46,1,176,44,1,184,42,1,192,40,1,200,38,1,208,36,1
        DW      216,34,1,224,32,5,288,32,3,8,64,3,32,66,1,40,68,1,48,70,1
        DW      56,72,6,136,72,6,216,72,6,264,70,1,272,68,1,280,66,1,288,64,3
        DW      24,104,10,136,104,6,216,104,10,16,136,9,120,136,10,232,136,9
        DW      8,176,8,104,176,2,120,174,1,128,172,1,136,170,1,144,168,4
        DW      176,170,1,184,172,1,192,174,1,200,176,2,248,176,8,0FFFFH
        DW      72,24,10,232,24,10,32,96,10,152,96,9,272,96,10,0FFFFH
        DW      0FFFFH,8,28,3,308,28,3,0FFFFH
        DW      16,26,1  [assume more data here]


scr_table breakdown:
screens are drawn in the following order:
girders, ladders, upropes, downropes, bombs (targets)
so:

DW      128, 12,  1,  136, 10,  2,152,8,2,168,10,2,184,12,1,8,32,3,56,32,5
        xpos,ypos,len,xpos,ypos,len... til FFFF

        repeat for ladders, ropes and bombs, in that order specificly.
        Length for girders is horizontal, everything else is vertical.
        bombs have no length.
Mar 24, 2016: Vector Graphics Games in AdvMAME on Raspberry Pi
Vector games look terrible in AdvanceMAME because it defaults to 640x480 resolution and there doesn’t appear to be a way to change that in the config file. I had to resort to recompiling the code and changing the defaults:
--- advance/osd/frame.c 2013-01-03 11:18:57.000000000 -0800
+++ advance/osd/frame.c 2016-03-24 19:26:03.331435328 -0700
@@ -2432,8 +2432,8 @@
                unsigned game_size_x;
                unsigned game_size_y;

-               mode_size_x = 640;
-               mode_size_y = 480;
+               mode_size_x = 1280;
+               mode_size_y = 1024;

                log_std(("emu:video: insert vector video modes\n"));
I haven’t been able to compile it on the rpi yet, but on my AMD64 box, I use ./configure --enable-expat --enable-sdl --enable-zlib --disable-slang --disable-svaglib --disable-static --enable-alsa --enable-fb --disable-oss --enable-freetype --with-emu=mame
UPDATE: I found the RetroPie Setup Script that looks like it has
been modified to use the display_width and display_height variables
as inputs to the vector width and height! So this hack doesn’t appear to be
needed in RetroPie distributions that use advmame 1.4!
Feb 18, 2016: Mulitple selection in action
Here’s one of the cool things that happens automatically in Omnivore. This example is an Atari DOS file, so the last 3 bytes of each sector are used for pointing to the next sector and specifying the number of bytes used in this sector. Operating in the ordinary sector editor mode would overwrite this metadata if you selected all the sectors. You can do multiple selection now, but why do it by hand?
Change to the file segment view and select all the data:

The metadata (the last 3 bytes of each sector) aren’t included in this view so you can operate as if it were a long string of bytes. But if you switch back to the sector view, you can see what you’re operating on:

You can then use the normal byte operations on the selected region and the metadata between sectors is not affected!

Feb 10, 2016: Adding multiple selection to Omnivore
I’m in the middle of adding multiple selection to Omnivore: you’ll be able to select multiple disjointed regions and operate on them using a single command.

You’ll be able to invert the selection, and I’m thinking about how to add an algorithmic selection to be able to specify, say, all the bytes with values greater than 0xa0, or all the bytes with addresses that end in a 0x3. Fun stuff like that!
Feb 1, 2016: RetroChallenge 2016/01 Summary
I interviewed Mark Reid for an upcoming episode of the podcast, and we talked about if he had thought about adding other maps or other cities to the game. Memory limitations precluded that, but he described how the maps were stored and how the AI worked with the map, so it would be possible today to create customized maps! The previous several entries in the blog was the log of my entry in the RetroChallenge 2016/01.
Jan 31, 2016: SURPRISE! Announcing Omnivore, the Atari 8-bit Binary Editor
I have not been making a map for Getaway! I have been making a map editor.

Omnivore is a cross-platform app for modern hardware (running linux, OS X and Windows) to work with executables or disk images of Atari 8-bit machines. (I have long-term goals to support editing MAME ROMS and disk images of other 8-bit machines like the C64 and Apple ][.)
It is still beta-level code, so testing and bug reports would be appreciated!
You can see the project on github.
Binaries are available for windows and OS X. Currently, Linux users must install from source: first install python 2.7, then wxPython, and use pip to install numpy, cython and finally omnivore.
Wade of the Inverse ATASCII Podcast has been using the editor to create the first custom map for Getaway! It is available on the AtariAge forums.
Full disclosure: I have been writing the framework for quite a while, over a year, but started the map editor portion for the RetroChallenge. This is the first public announcement of this project, right here at this RetroChallenge.
Jan 20, 2016: Tile palette
There are about 150 useful tiles for creating maps, which I’ve broken out by category:
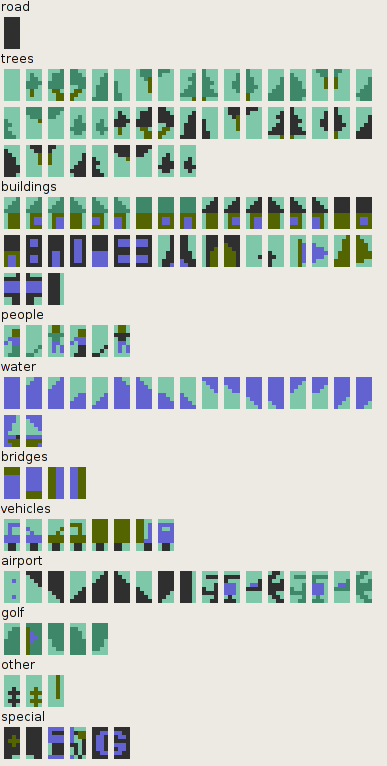
But really, as far as the game is concerned there might as well be only two types:
road
not road
although that’s not entirely true. We’ve seen that the gas station characters work and the home base characters work to a lesser extent.
If you’re not familiar with the Atari character sets, there are 256 characters but only 128 have unique bit patterns. The second 128 characters use the same bit patters as the first 128 but the Atari hardware interprets them differently. In ANTIC mode 2 (e.g. BASIC Graphics mode 0, the normal text mode), the second 128 are inverse characters. In ANTIC modes 4 and 5, colors are determined by pairs of bits. The first 128 characters use playfield colors 0 through 3, and the second 128 have a slightly different usage of the palette: bitpairs that have both bits turned on will use playfield color 3 instead of playfield color 2.
Jan 8, 2016: Discovering the first (and second) limitation
Here’s the character set for the game:

The bulk of the characters are just background tiles to represent different
bits of the city: the trees, the buildings, aircraft, etc. The special tiles
for the gas stations and your hideout are in the 0x70 row, and we’ve already
seen that the roads are the `p` character.
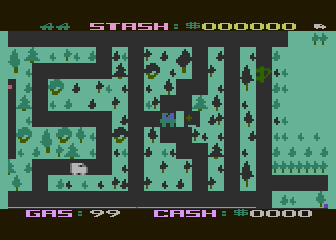
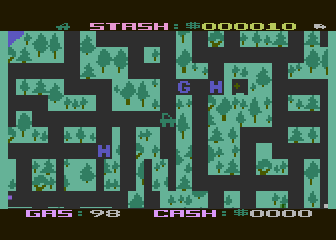
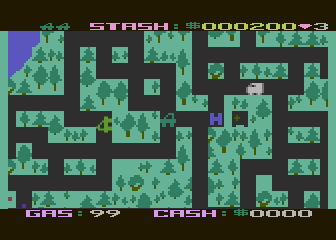
I tried replacing the old hideout with road and moving it to a new location, as well as adding a new gas station:
First: the good news.
The new gas station and the new hideout both appear, but the old hideout is
redrawn and you start at the original location. I think this is due to the
fact that the game only allows you to stay in your hideout for a limited
amount of time. When you are in your hideout you are invulnerable to the
police, and the game and will erase the hideout and remove that safety if you
sit there for too long. I’m not sure the exact amount of time, but the hideout
building (not the `H`) will begin flashing when you have a few seconds of
safety remaining.
The new hideout location does act as a safety, though, and the new gas station does work. So it appears that the hideout location is hardcoded somewhere, but as far as I can tell at this point, that’s the only thing that is. The game probably redraws the hideout at the beginning of each game in case the last game ended with the hideout being hidden.
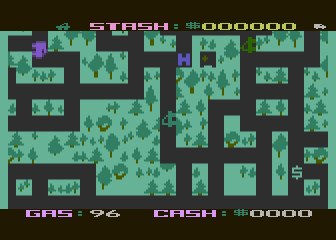
Next: the bad news.
The game crashes after a little bit of time. I’m not sure if it’s because of the new roads or the new gas station/hideout modifications. Obviously it’s something I did because the unmodified game will run forever.
UPDATE: it’s the roads. Apparently, you can’t have a dead end.
The computer controlled cars don’t handle dead ends at all, the game just goes into an infinite loop when the car reaches the end of the road. So, I’ll have to make sure that my new roads don’t have any dead ends anywhere.
So, to recap: the hideout has to stay in the same location (presupposing that I’m not going to tackle the originally-out-of-scope task of hacking the program) and roads can’t dead end. Got it.
Jan 7, 2016: Where can the roads go?
The game is in ANTIC mode 5, which is the 40x12 mode (in full screen) where the characters are twice as tall as they are wide. At the pixel level, they are graphics 7 pixels, two scan lines tall and one color clock wide. Each unit of road in the game is two characters wide and one character tall.
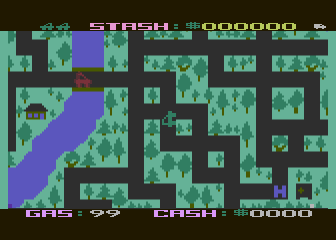
There are no roads anywhere on the map that are offset horizontally by only one character, they are always offset by two, so I thought to test if it were hardcoded. Here’s that experiment:
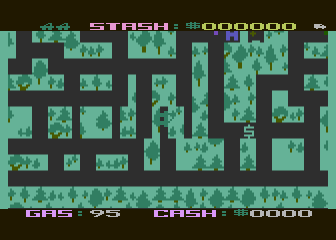
In this test there are several roads starting on even or odd character boundaries, and it looks like the road detection is only performed on the even character; that is: the character that makes up the left half of the road.
The narrow roads on an odd character are not passable; it acts as if it were not there and the car can’t be turned down that road. The narrow roads on an even character are drivable, despite your car running over trees on what would be the right half of the road.
So without modifying any assembly code, I will have to limit my map modifications such that the roads are two characters wide where the left character is on an even cell number.
Jan 4, 2016: A new road
Talking with Mark Reid in my (forthcoming) interview with him, he stated that everything that the program needed to define the roads was purely in the scrolling map data as stored on disk; there is no other metadata associated with it. So, changing the characters should result in a new map.
Looking at a raw hex dump of the ATR image found at atarimania, the map starts
at sector 66. As noted below, it is 256 characters wide and 64 characters tall.
Roads are the `p` character. My first change: ŷ .. figure:: jan4-1.png
- align
left
Original
One new road
And it works!
Dec 31, 2015: Pre-RetroChallenge
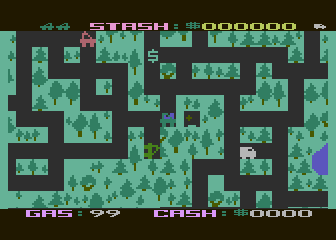
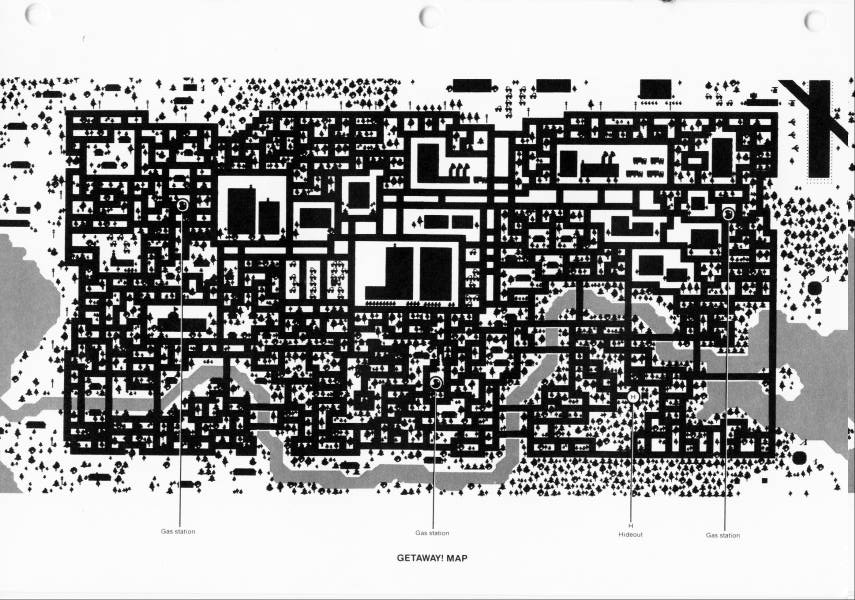
The classic game Getaway! was written by Mark Reid, published by the Atari Program Exchange (APX) and won the 1983 Atari Star award for best software published through APX that year.
It’s sort of a very large scrolling Pac-Man type game, where you drive your car collecting loot that randomly appears in locations all over the city, refueling at gas stations when necessary and depositing your ill-gotten gains at your hideout to increase your stash. Roaming police vehicles will arrest you if they catch your car.
The map is very large, over 6 screens wide and over 5 screens tall. The full map is shown here, and was also available as large poster through APX (part number APX-90012)
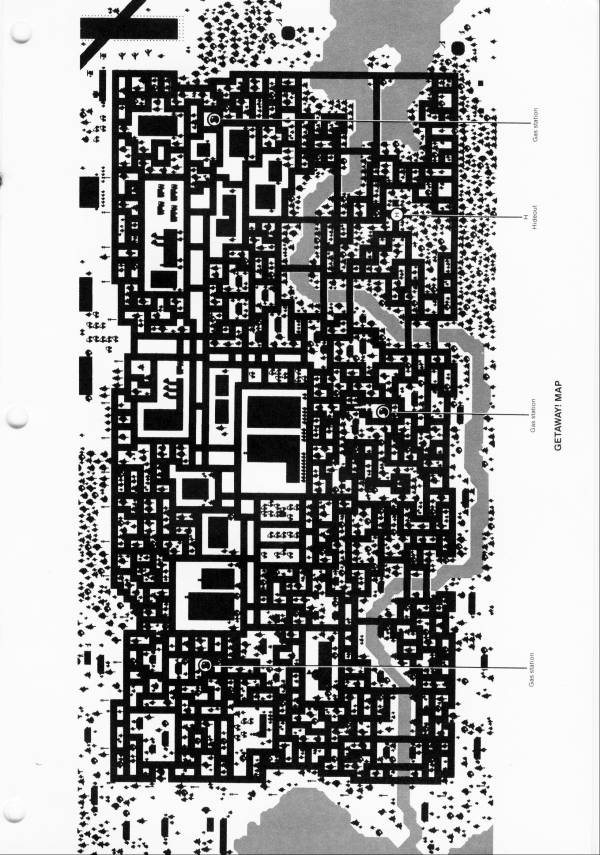
To learn more about the program, I broke into it using the Atari800 emulator and checked out the display list so I could figure out how the map was stored. When your car is at the at the extreme top left of the big scrolling map, the display list looks like this:
> dlist
1F46: 2x 8 BLANK
1F48: 6 BLANK
1F49: DLI LMS 1ABC MODE 6
1F4C: 1 BLANK
1F4D: LMS 3001 VSCROL HSCROL MODE 5
1F50: LMS 3101 VSCROL HSCROL MODE 5
1F53: LMS 3201 VSCROL HSCROL MODE 5
1F56: LMS 3301 VSCROL HSCROL MODE 5
1F59: LMS 3401 VSCROL HSCROL MODE 5
1F5C: LMS 3501 VSCROL HSCROL MODE 5
1F5F: LMS 3601 VSCROL HSCROL MODE 5
1F62: LMS 3701 VSCROL HSCROL MODE 5
1F65: LMS 3801 VSCROL HSCROL MODE 5
1F68: LMS 3901 VSCROL HSCROL MODE 5
1F6B: LMS 3A01 VSCROL HSCROL MODE 5
1F6E: DLI LMS 3B01 HSCROL MODE 5
1F71: LMS 1A80 MODE E
1F74: LMS 1AE4 MODE 6
1F77: JVB 1F46
and at the furthest to the bottom and right:
> dlist
1F46: 2x 8 BLANK
1F48: 6 BLANK
1F49: DLI LMS 1ABC MODE 6
1F4C: 1 BLANK
1F4D: LMS 64CD VSCROL HSCROL MODE 5
1F50: LMS 65CD VSCROL HSCROL MODE 5
1F53: LMS 66CD VSCROL HSCROL MODE 5
1F56: LMS 67CD VSCROL HSCROL MODE 5
1F59: LMS 68CD VSCROL HSCROL MODE 5
1F5C: LMS 69CD VSCROL HSCROL MODE 5
1F5F: LMS 6ACD VSCROL HSCROL MODE 5
1F62: LMS 6BCD VSCROL HSCROL MODE 5
1F65: LMS 6CCD VSCROL HSCROL MODE 5
1F68: LMS 6DCD VSCROL HSCROL MODE 5
1F6B: LMS 6ECD VSCROL HSCROL MODE 5
1F6E: DLI LMS 6FCD HSCROL MODE 5
1F71: LMS 1A80 MODE E
1F74: LMS 1AE4 MODE 6
1F77: JVB 1F46
and found that the map was stored as a contiguous huge block of memory between 3000 and 6fff in memory, in the format of 256 characters wide and 64 characters tall. I saved it out using:
> write 3000 6fff getaway.dat
That’s only half of it, though, because you need the custom font to display. The character set is easy to find, just look at the memory location CHBAS $2f4:
> m 2f4
02F4: 14 00 00 00 00 00 80 00 FF 00 00 00 31 01 52 01  ............1.R.
> write 1400 17ff getaway.fnt
Although as it turns out this is for the text font for the static stuff: the score display and things on the top and bottom of the screen and not the game map font! The font must be changed during the DLI, setting the hardware register CHBASE ($d409) directly, and not the shadow register at $2f4. So, have to look at the DLI:
> m 200
0200: 7A 1F 8F E7 8F E7 8F E7 BE FF 0F EB 90 EA CF EA  z...............

> d 1f7a
1F7A: 48        PHA
1F7B: A9 14     LDA #$14
1F7D: 45 4F     EOR $4F     ;COLRSH
1F7F: 25 4E     AND $4E     ;DRKMSK
1F81: 8D 0A D4  STA $D40A   ;WSYNC
1F84: 8D 16 D0  STA $D016   ;COLPF0
1F87: A9 10     LDA #$10
1F89: 8D 09 D4  STA $D409   ;CHBASE
1F8C: A9 86     LDA #$86
1F8E: 45 4F     EOR $4F     ;COLRSH
1F90: 25 4E     AND $4E     ;DRKMSK
1F92: 8D 17 D0  STA $D017   ;COLPF1
1F95: A9 02     LDA #$02
1F97: 45 4F     EOR $4F     ;COLRSH
1F99: 25 4E     AND $4E     ;DRKMSK
1F9B: 8D 18 D0  STA $D018   ;COLPF2
1F9E: A5 87     LDA $87     ;VVTP+1
1FA0: 45 4F     EOR $4F     ;COLRSH
1FA2: 25 4E     AND $4E     ;DRKMSK
1FA4: 8D 0A D4  STA $D40A   ;WSYNC
1FA7: 8D 1A D0  STA $D01A   ;COLBK
1FAA: A9 B6     LDA #$B6
1FAC: 8D 00 02  STA $0200   ;VDSLST
1FAF: A9 1F     LDA #$1F
1FB1: 8D 01 02  STA $0201   ;VDSLST+1
1FB4: 68        PLA
1FB5: 40        RTI
And there’s the other font: it sets CHBASE to $10, meaning that the font is $1000. As an aside, as was indicated in the display list: there are two DLI triggers, so this DLI sets VDSLST ($200) to the other DLI at $1fb6:
> d 1fb6
1FB6: 48        PHA
1FB7: A5 86     LDA $86     ;VVTP
1FB9: 45 4F     EOR $4F     ;COLRSH
1FBB: 25 4E     AND $4E     ;DRKMSK
1FBD: EA        NOP
1FBE: EA        NOP
1FBF: EA        NOP
1FC0: EA        NOP
1FC1: EA        NOP
1FC2: 8D 0A D4  STA $D40A   ;WSYNC
1FC5: 8D 1A D0  STA $D01A   ;COLBK
1FC8: A9 14     LDA #$14
1FCA: 8D 09 D4  STA $D409   ;CHBASE
1FCD: A9 0C     LDA #$0C
1FCF: 45 4F     EOR $4F     ;COLRSH
1FD1: 25 4E     AND $4E     ;DRKMSK
1FD3: 8D 16 D0  STA $D016   ;COLPF0
1FD6: A9 6C     LDA #$6C
1FD8: 45 4F     EOR $4F     ;COLRSH
1FDA: 25 4E     AND $4E     ;DRKMSK
1FDC: 8D 17 D0  STA $D017   ;COLPF1
1FDF: A9 7A     LDA #$7A
1FE1: 8D 00 02  STA $0200   ;VDSLST
1FE4: A9 1F     LDA #$1F
1FE6: 8D 01 02  STA $0201   ;VDSLST+1
1FE9: 68        PLA
1FEA: 40        RTI
where it sets the DLI back to the other routine and resets the character set to the text font so it can display the GAS and CASH line at the bottom of the screen. I saved out the map font using:
> write 1000 13ff getaway-playfield.fnt